前言
需要在 CTFd 平台中加入当提交 flag 则会在群中播报并且还可以返回排行榜的功能。群聊机器人的实现依赖于 cq-http。整个部署完全使用 Docker。
框架图如下:
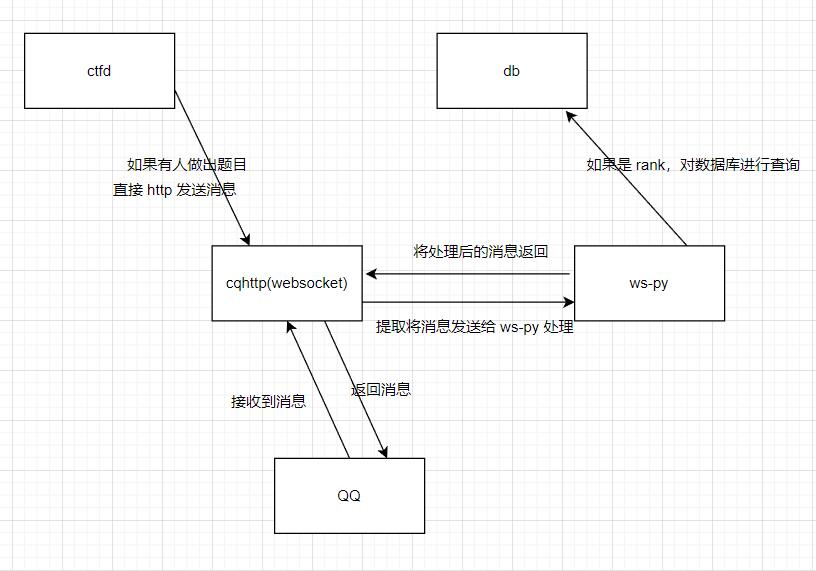
在此记录并分享思路。
sign-server
在部署 cqhttp 前,我们需要先搭建签名服务器,用于登录验证。新建一个目录
mkdir -p ~/docker/unidbg-fetch-qsign
在当前目录下创建 docker-compose.yml:
version: '2'

services:
  qsign:
    # 填写Dockerfile所在目录
    build: .
    environment:
      TZ: Asia/Shanghai
    restart: always
    ports:
      # 按需调整端口映射
      - 8901:8080
在当前目录下创建 Dockerfile 文件
FROM openjdk:22-slim-bookworm
WORKDIR /code

# >>>>>>切换镜像源
RUN echo "deb http://mirrors.cernet.edu.cn/debian/ bookworm main contrib non-free non-free-firmware" > /etc/apt/sources.list && \
    echo "deb http://mirrors.cernet.edu.cn/debian/ bookworm-updates main contrib non-free non-free-firmware" >> /etc/apt/sources.list && \
    echo "deb http://mirrors.cernet.edu.cn/debian/ bookworm-backports main contrib non-free non-free-firmware" >> /etc/apt/sources.list && \
    echo "deb http://mirrors.cernet.edu.cn/debian-security bookworm-security main contrib non-free non-free-firmware" >> /etc/apt/sources.list && \
    rm -r /etc/apt/sources.list.d
# <<<<<<

RUN apt-get update
RUN apt-get install -y wget unzip

# 下载unidbg-fetch-qsign,可以自己选择想要的版本
RUN wget -O sign.zip https://github.com/fuqiuluo/unidbg-fetch-qsign/releases/download/1.1.5/qsign-1.1.5.onejar.zip && \
    unzip sign.zip

# 在这里要选好QQ协议的版本
CMD [ "bash","/code/unidbg-fetch-qsign-shadow-1.1.5/bin/unidbg-fetch-qsign","--basePath=/code/unidbg-fetch-qsign-shadow-1.1.5/txlib/8.9.63"]
运行 docker-compose up -d 即可
cqhttp
核心是 cqhttp。你可以把 cqhttp 理解为一个消息处理器,机器人在 QQ 中接收到的消息几乎都会上报给它,可以通过它来直接发送信息。
我们先将这个文件下载下来
mkdir websocket-cqhttp
cd websocket-cqhttp
wget https://github.com/Mrs4s/go-cqhttp/releases/download/v1.1.0/go-cqhttp_linux_amd64.tar.gz
tar -zxvf go-cqhttp_linux_amd64.tar.gz
我这里定义了 filter.json 只处理前缀为 / 的消息。
filter.json 内容如下:
{
    "raw_message": {
        ".regex": "^/"
    }
}
其次 config.yml 的内容如下(这里我是手表协议的扫码登录)除了一些明显标注的地方外,还需要额外注意 access-token:
# go-cqhttp 默认配置文件

account: # 账号相关
  uin: 需要修改 # QQ账号
  password: '' # 密码为空时使用扫码登录
  encrypt: false  # 是否开启密码加密
  status: 0      # 在线状态 请参考 https://docs.go-cqhttp.org/guide/config.html#在线状态
  relogin: # 重连设置
    delay: 3   # 首次重连延迟, 单位秒
    interval: 3   # 重连间隔
    max-times: 0  # 最大重连次数, 0为无限制

  # 是否使用服务器下发的新地址进行重连
  # 注意, 此设置可能导致在海外服务器上连接情况更差
  use-sso-address: true
  # 是否允许发送临时会话消息
  allow-temp-session: false

  # 数据包的签名服务器
  # 兼容 https://github.com/fuqiuluo/unidbg-fetch-qsign
  # 如果遇到 登录 45 错误, 或者发送信息风控的话需要填入一个服务器
  # 示例:
  # sign-server: 'http://127.0.0.1:8080' # 本地签名服务器
  # sign-server: 'https://signserver.example.com' # 线上签名服务器
  # 服务器可使用docker在本地搭建或者使用他人开放的服务
  sign-server: '需要修改'

heartbeat:
  # 心跳频率, 单位秒
  # -1 为关闭心跳
  interval: 5

message:
  # 上报数据类型
  # 可选: string,array
  post-format: string
  # 是否忽略无效的CQ码, 如果为假将原样发送
  ignore-invalid-cqcode: true
  # 是否强制分片发送消息
  # 分片发送将会带来更快的速度
  # 但是兼容性会有些问题
  force-fragment: false
  # 是否将url分片发送
  fix-url: false
  # 下载图片等请求网络代理
  proxy-rewrite: ''
  # 是否上报自身消息
  report-self-message: false
  # 移除服务端的Reply附带的At
  remove-reply-at: false
  # 为Reply附加更多信息
  extra-reply-data: false
  # 跳过 Mime 扫描, 忽略错误数据
  skip-mime-scan: false
  # 是否自动转换 WebP 图片
  convert-webp-image: false
  # http超时时间
  http-timeout: 0

output:
  # 日志等级 trace,debug,info,warn,error
  log-level: warn
  # 日志时效 单位天. 超过这个时间之前的日志将会被自动删除. 设置为 0 表示永久保留.
  log-aging: 15
  # 是否在每次启动时强制创建全新的文件储存日志. 为 false 的情况下将会在上次启动时创建的日志文件续写
  log-force-new: true
  # 是否启用日志颜色
  log-colorful: true
  # 是否启用 DEBUG
  debug: false # 开启调试模式

# 默认中间件锚点
default-middlewares: &default
  # 访问密钥, 强烈推荐在公网的服务器设置
  access-token: '1337' # 按需修改
  # 事件过滤器文件目录
  filter: '/data/filter.json'
  # API限速设置
  # 该设置为全局生效
  # 原 cqhttp 虽然启用了 rate_limit 后缀, 但是基本没插件适配
  # 目前该限速设置为令牌桶算法, 请参考:
  # https://baike.baidu.com/item/%E4%BB%A4%E7%89%8C%E6%A1%B6%E7%AE%97%E6%B3%95/6597000?fr=aladdin
  rate-limit:
    enabled: true # 是否启用限速
    frequency: 1  # 令牌回复频率, 单位秒
    bucket: 1     # 令牌桶大小

database: # 数据库相关设置
  leveldb:
    # 是否启用内置leveldb数据库
    # 启用将会增加10-20MB的内存占用和一定的磁盘空间
    # 关闭将无法使用 撤回 回复 get_msg 等上下文相关功能
    enable: false
  sqlite3:
    # 是否启用内置sqlite3数据库
    # 启用将会增加一定的内存占用和一定的磁盘空间
    # 关闭将无法使用 撤回 回复 get_msg 等上下文相关功能
    enable: false
    cachettl: 3600000000000 # 1h

# 连接服务列表
servers:
  # 添加方式,同一连接方式可添加多个,具体配置说明请查看文档
  #- http: # http 通信
  #- ws:   # 正向 Websocket
  #- ws-reverse: # 反向 Websocket
  #- pprof: #性能分析服务器

  - http: # HTTP 通信设置
      address: 0.0.0.0:5700 # HTTP监听地址
      version: 11     # OneBot协议版本, 支持 11/12
      timeout: 5      # 反向 HTTP 超时时间, 单位秒,<5 时将被忽略
      long-polling:   # 长轮询拓展
        enabled: false       # 是否开启
        max-queue-size: 2000 # 消息队列大小,0 表示不限制队列大小,谨慎使用
      middlewares:
        <<: *default # 引用默认中间件
      post:           # 反向HTTP POST地址列表
      #- url: ''                # 地址
      #  secret: ''             # 密钥
      #  max-retries: 3         # 最大重试,0 时禁用
      #  retries-interval: 1500 # 重试时间,单位毫秒,0 时立即
      #- url: http://127.0.0.1:5701/ # 地址
      #  secret: ''                  # 密钥
      #  max-retries: 10             # 最大重试,0 时禁用
      #  retries-interval: 1000      # 重试时间,单位毫秒,0 时立即
  # 正向WS设置
  - ws:
      # 正向WS服务器监听地址
      address: 0.0.0.0:8080
      middlewares:
        <<: *default # 引用默认中间件
除了 go-cqhttp 此外还有两个重要文件,device.json 和 session.token。虽然这两个文件在你使用扫码登录后会自动生成,但在服务器上往往登录失败。因此建议现在本地上登录后使用本地生成的文件。
ws-py
这个其实只需要一个脚本就可以通过 websocket 协议与 cqhttp 交互主动发消息,但是他还需要查询 ctfd 的数据库的任务。而 ctfd 数据库查总分的话还是有点麻烦的,需要多表联合。SQL 语句如下:
SELECT u.name, SUM(c.value) as total
    FROM challenges c, users u, solves s
    WHERE u.id = s.user_id AND c.id = s.challenge_id AND u.hidden != 1
    GROUP BY u.name ORDER BY total DESC LIMIT 5;
下面是完整的代码 app.py:
import websocket
import json
import time
from sqlalchemy import create_engine, text


# 修改为使用SQLAlchemy连接数据库
engine = create_engine('mysql+pymysql://ctfd:ctfd@db/ctfd')
group_id = "按需修改" # 群号


def getConn():
  try:
      connection = engine.connect()
      return connection
  except Exception as e:
      print(f"Error connecting to MariaDB: {e}")

def on_message(ws, message):
    # 在此处进行接收到的消息的处理判断
    reply_message = None
    json_message = json.loads(message)
    connection = getConn()
    if 'message' in json_message.keys():
        if json_message['message_type'] == 'group':
            if json_message['message'] == '/rank':
                # 使用SQLAlchemy执行查询
                query = """
                    SELECT u.name, SUM(c.value) as total
                    FROM challenges c, users u, solves s
                    WHERE u.id = s.user_id AND c.id = s.challenge_id AND u.hidden != 1
                    GROUP BY u.name
                    ORDER BY total DESC
                    LIMIT 5;
                """
                result = connection.execute(text(query)).fetchall()
                connection.close()
                total_message = ""
                for row in result:
                    name, total = row
                    total_message += f"{name}, {total}\n"
                total_message += "..."
                reply_message = {
                    "action": "send_msg",
                    "params": {
                        "message_type": "group",
                        "group_id": group_id,
                        "message": total_message
                    }
                }

    if reply_message:
        ws.send(json.dumps(reply_message))
        time.sleep(0.3)

def on_error(ws, error):
    print("Error:", error)

def on_close(ws):
    print("WebSocket connection closed")

def on_open(ws):
    print("WebSocket connection established")

if __name__ == "__main__":
    header = {
        "Authorization": "Bearer 1337" # 按需修改!!!!
    }
    ws = websocket.WebSocketApp("ws://cqhttp:8080", header=header, on_message=on_message, on_close=on_close)
    ws.on_open = on_open
    ws.run_forever()
requirements.txt 如下:
websocket-client==1.6.1
sqlalchemy==1.4.22
Dockerfile 如下:
FROM python:3.9.5-slim

COPY ./app/ /src/
RUN /usr/local/bin/python -m pip install --upgrade pip && pip install --upgrade setuptools && pip install --upgrade wheel && pip install -r /src/requirements.txt && pip install pymysql
WORKDIR /src


CMD ["python", "app.py"]
创建上述文件步骤:
mkdir web-py;cd web-py
vim Dockerfile
mkdir app;cd app
vim app.py
vim requirements.txt
CTFd
首先要做的是
git clone https://github.com/CTFd/CTFd.git
前面的准备工作只解决了群聊机器人能够查询数据库并发送的问题,我们还没解决机器人当玩家答题正确时在群中播报的问题。不过这个很简单。我们只需要修改 CTFd/CTFd/api/v1/challenges.py 即可。我们可以在这个文件的代码中发现如下注释:# The challenge plugin says the input is right
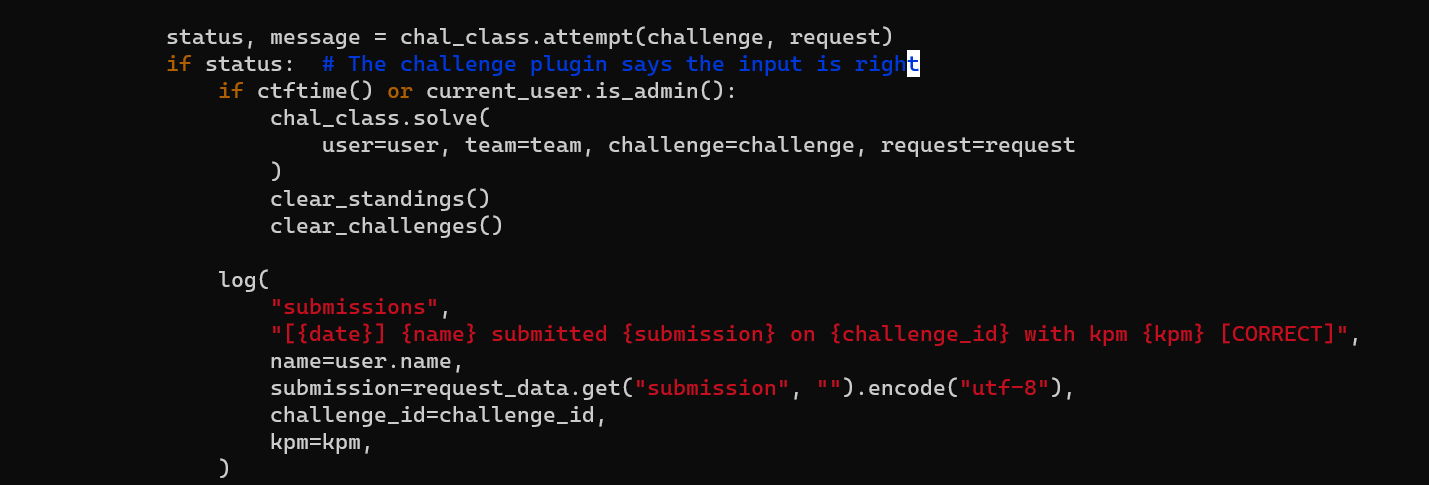
在这个 if 语句的合适位置中可以添加发送消息的代码逻辑(使用 http 协议的方式),例如我添加的内容为(记得在这个文件中引入 requests 模块):
            if status:  # The challenge plugin says the input is right
                if ctftime() or current_user.is_admin():
                    chal_class.solve(
                        user=user, team=team, challenge=challenge, request=request
                    )
                    clear_standings()
                    clear_challenges()

                log(
                    "submissions",
                    "[{date}] {name} submitted {submission} on {challenge_id} with kpm {kpm} [CORRECT]",
                    name=user.name,
                    submission=request_data.get("submission", "").encode("utf-8"),
                    challenge_id=challenge_id,
                    kpm=kpm,
                )
                params = {
                    "message_type": 'group',
                    "group_id": '按需修改',
                    "message": f'「{user.name}」成功解答了「{challenge.name}」'
                }
                headers = {
                    "Authorization": "Bearer 1337" # 按需修改!!!
                }
                requests.get(url='http://cqhttp:5700/send_msg', params=params, headers=headers)
我这里用 Let’s Encrypt 的证书。
首先安装 Certbot
sudo apt-get install certbot python3-certbot-nginx -y
流程大概如下:用 certbot certonly --manual --preferred-challenges dns 可以指定使用 dns 的方式,只需要添加 txt 记录即可申请到
root@LAPTOP-B9A811D6:/tmp# certbot certonly --manual --preferred-challenges dns
Saving debug log to /var/log/letsencrypt/letsencrypt.log
Plugins selected: Authenticator manual, Installer None
Please enter in your domain name(s) (comma and/or space separated)  (Enter 'c'
to cancel): recruit.aegis.show
Obtaining a new certificate
Performing the following challenges:
dns-01 challenge for recruit.aegis.show

- - - - - - - - - - - - - - - - - - - - - - - - - - - - - - - - - - - - - - - -
NOTE: The IP of this machine will be publicly logged as having requested this
certificate. If you're running certbot in manual mode on a machine that is not
your server, please ensure you're okay with that.

Are you OK with your IP being logged?
- - - - - - - - - - - - - - - - - - - - - - - - - - - - - - - - - - - - - - - -
(Y)es/(N)o: Y

- - - - - - - - - - - - - - - - - - - - - - - - - - - - - - - - - - - - - - - -
Please deploy a DNS TXT record under the name
_acme-challenge.recruit.aegis.show with the following value:

**********************************************

Before continuing, verify the record is deployed.
- - - - - - - - - - - - - - - - - - - - - - - - - - - - - - - - - - - - - - - -
Press Enter to Continue
Waiting for verification...
Cleaning up challenges

IMPORTANT NOTES:
 - Congratulations! Your certificate and chain have been saved at:
   /etc/letsencrypt/live/recruit.aegis.show/fullchain.pem
   Your key file has been saved at:
   /etc/letsencrypt/live/recruit.aegis.show/privkey.pem
   Your cert will expire on 2023-10-23. To obtain a new or tweaked
   version of this certificate in the future, simply run certbot
   again. To non-interactively renew *all* of your certificates, run
   "certbot renew"
 - If you like Certbot, please consider supporting our work by:

   Donating to ISRG / Let's Encrypt:   https://letsencrypt.org/donate
   Donating to EFF:                    https://eff.org/donate-le
此外我们还需要加上证书。修改 /CTFd/conf/nginx/http.conf 文件内容如下:
worker_processes 4;

events {

  worker_connections 1024;
}

http {

  # Configuration containing list of application servers
  upstream app_servers {

    server ctfd:8000;
  }

  server {

    listen 80;
    listen 443 ssl;
    gzip on;

    client_max_body_size 4G;
    server_name  recruit.aegis.show;
    ssl_certificate /etc/letsencrypt/live/recruit.aegis.show/fullchain.pem; # 这里改一下域名
    ssl_certificate_key /etc/letsencrypt/live/recruit.aegis.show/privkey.pem; # 这里改一下域名
    ssl_session_timeout  5m;    #缓存有效期
    ssl_ciphers ECDHE-RSA-AES128-GCM-SHA256:ECDHE:ECDH:AES:HIGH:!NULL:!aNULL:!MD5:!ADH:!RC4;    #加密算法
    ssl_protocols TLSv1 TLSv1.1 TLSv1.2;    #安全链接可选的加密协议
    ssl_prefer_server_ciphers on;   #使用服务器端的首选算法
    # Handle Server Sent Events for Notifications
    location /events {

      proxy_pass http://app_servers;
      proxy_set_header Connection '';
      proxy_http_version 1.1;
      chunked_transfer_encoding off;
      proxy_buffering off;
      proxy_cache off;
      proxy_redirect off;
      proxy_set_header Host $host;
      proxy_set_header X-Real-IP $remote_addr;
      proxy_set_header X-Forwarded-For $proxy_add_x_forwarded_for;
      proxy_set_header X-Forwarded-Host $server_name;
    }

    # Proxy connections to the application servers
    location / {

      proxy_pass http://app_servers;
      proxy_redirect off;
      proxy_set_header Host $host;
      proxy_set_header X-Real-IP $remote_addr;
      proxy_set_header X-Forwarded-For $proxy_add_x_forwarded_for;
      proxy_set_header X-Forwarded-Host $server_name;
    }
  }
}
将 fullchain.pem 和 privkey.pem 放在合适位置进行挂载,最终我的 /CTFd 下的 docker-compose.yml 如下:
version: '2'

services:
  ctfd:
    build: .
    user: root
    restart: always
    ports:
      - "8000:8000"
    environment:
      - UPLOAD_FOLDER=/var/uploads
      - DATABASE_URL=mysql+pymysql://ctfd:ctfd@db/ctfd
      - REDIS_URL=redis://cache:6379
      - WORKERS=1
      - LOG_FOLDER=/var/log/CTFd
      - ACCESS_LOG=-
      - ERROR_LOG=-
      - REVERSE_PROXY=true
    volumes:
      - .data/CTFd/logs:/var/log/CTFd
      - .data/CTFd/uploads:/var/uploads
      - .:/opt/CTFd
    depends_on:
      - db
    networks:
        default:
        internal:
  db:
    image: mariadb:10.4.12
    restart: always
    container_name: db
    environment:
      - MYSQL_ROOT_PASSWORD=ctfd
      - MYSQL_USER=ctfd
      - MYSQL_PASSWORD=ctfd
      - MYSQL_DATABASE=ctfd
    volumes:
      - .data/mysql:/var/lib/mysql
    networks:
        internal:
    # This command is required to set important mariadb defaults
    command: [mysqld, --character-set-server=utf8mb4, --collation-server=utf8mb4_unicode_ci, --wait_timeout=28800, --log-warnings=0]

  cache:
    image: redis:4
    restart: always
    volumes:
    - .data/redis:/data
    networks:
        internal:
  cqhttp:
    image: ghcr.io/mrs4s/go-cqhttp:master
    container_name: cqhttp
    volumes:
      - ./websocket-cqhttp/config.yml:/data/config.yml
      - ./websocket-cqhttp/device.json:/data/device.json
      - ./websocket-cqhttp/filter.json:/data/filter.json
      - ./websocket-cqhttp/session.token:/data/session.token
    restart: unless-stopped
    networks:
        default:
        internal:
  wspy:
    build: ./websocket-cqhttp/web-py/
    container_name: wspy
    depends_on:
      - db
    volumes:
      - ./websocket-cqhttp/web-py/app/:/src/
    restart: unless-stopped
    environment:
      - DATABASE_URL=mysql+pymysql://ctfd:ctfd@db/ctfd
    networks:
        default:
        internal:
  nginx:
    image: nginx:stable
    restart: always
    volumes:
      - ./conf/nginx/http.conf:/etc/nginx/nginx.conf
      - ./fullchain.pem:/etc/letsencrypt/live/recruit.aegis.show/fullchain.pem
      - ./privkey.pem:/etc/letsencrypt/live/recruit.aegis.show/privkey.pem
    ports:
      - 80:80
      - 443:443
    depends_on:
      - ctfd
networks:
    default:
    internal:
        internal: true
只需在 /CTFd 目录下执行 docker-compose up -d 即可一次性运行上述应用(除了签名服务器)
成果
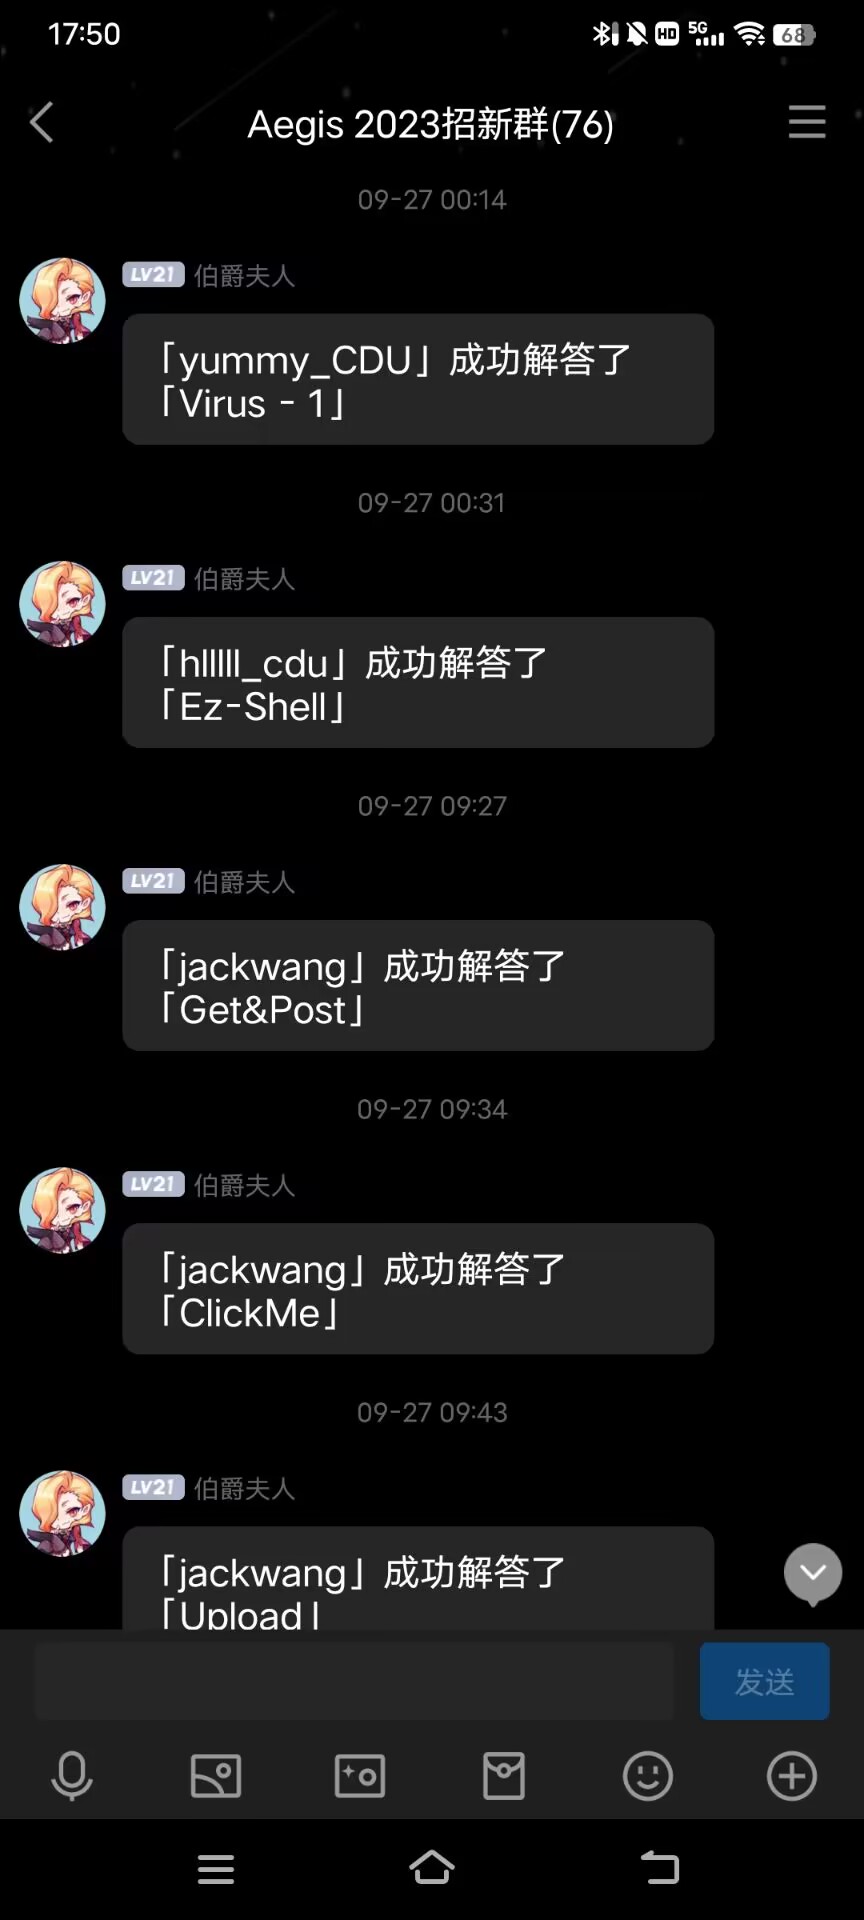
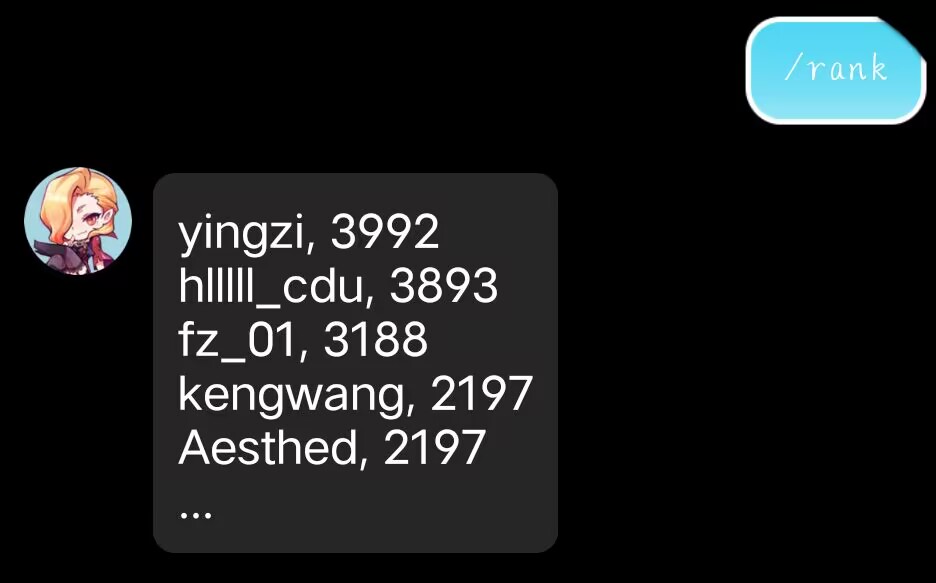
一些可能的错误
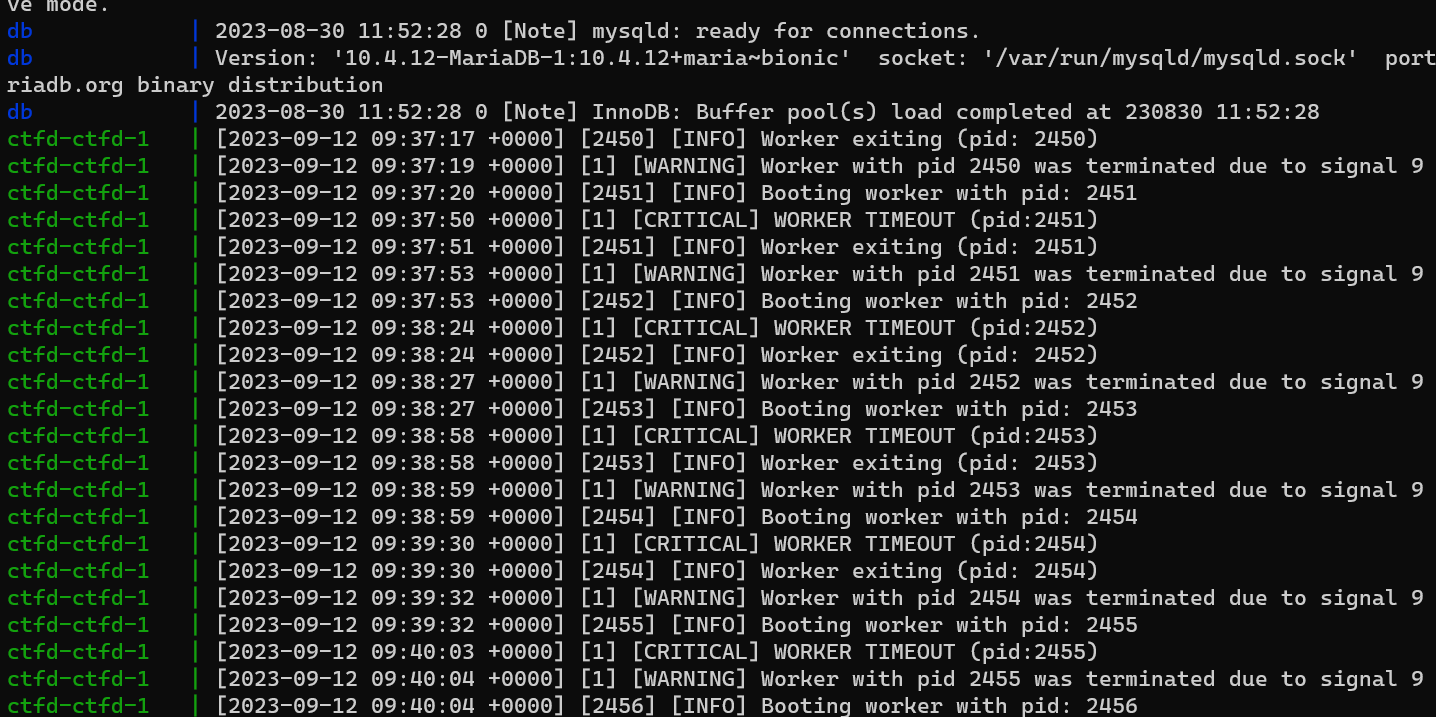
参考 https://github.com/CTFd/CTFd/issues/468 也没有获得有效信息。写个定时任务重启 docker 应用即可解决。